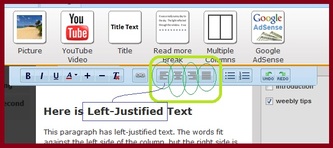
 "Weebly Text Justification" image by Mike DeHaan "Weebly Text Justification" image by Mike DeHaan What is text justification? How can you justify text in a Weebly blog? Why should you justify text online? Text justification means handling the words to fill a column. Weebly offers four options:- Left justification is the default.
- Centre justification.
- Right justification.
- Full justification.
The big deal is that clicking the appropriate text justification icon affects the whole "Weebly paragraph" you're editing. That's the widget you've dragged from the main toolbar; not just the paragraph you define when typing by leaving a blank line.
Here is Left-Justified Text
This paragraph has left-justified text. The words fit against the left side of the column, but the right side is "ragged". Why does the right side not fit tight against the margin? Words are of different lengths, and the online editor does not try to break words to make a line fit against the right margin. So the right side of the text snakes down. This can be tiring to read, but mainly if one paragraph goes on and on; just like this example!
This is the default, but you can deliberately choose it in the menu bar.
How to Centre Justify Text
I clicked the centre justification icon before starting this paragraph.
As I type, the first letters appear in the centre of the column. Then the text gets pushed left and right as I type more and more words. If the paragraph runs on and on, we see that the final effect looks pretty interesting: each line fills from the centre.
I'd welcome comments from anyone who has a reason for writing articles that are centre-justified.
Even poetry may be best
justified from the left.
Right Justification
After clicking on the right justify icon, the text starts at the right margin and gets pushed left.
This is, obviously, the mirror of left justification.
It can be pretty useful if you want to list numbers so people can count them.
17
1,548,201
4,298
Other than that, the ragged left margin annoys me.
Full Justification
When you type into a full justification paragraph, it starts off like left justification. The text begins at the left margin, and each space between words remains solitary. However, as you type, the words may suddenly get pushed onto the next line; and the line above may gain extra spaces between the words. That "justifies" the text on both sides, so neither margin is ragged. Full justification looks very tidy. It's common for newspaper columns.
The final sentence is left-justified with no extra spaces.
One problem is that you can get a band of blanks meandering down a column if the extra spaces are embedded exactly correctly. I'm trying to make a diagonal spacing line in this paragraph, descending from the left of "is", "down", "exactly" and "diagonal". It has not worked very well past the third line.
Choose your Justification (rather than "Justify your Choice")
Weebly's narrow columns do not need full justification, especially if you use short paragraphs. The default left justification looks okay, and somewhat informal.
Having said that, I just noticed the "full justification" effect recently and prefer it. I expect to make it a habit to fully justify each section in my future Weebly articles.
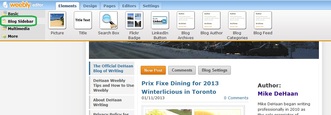 Weebly Sidebar #1 : image by Mike DeHaan Thanks to reader Renu, who asked "...how to add a blogroll or links tab to the Weebly sidebar"?
I'm only going to address part of the question here.
Please see the above image.
In that picture, my Weebly blog is open for editing, but I have not yet begun to edit a specific post.
The “Blog Sidebar” tab is active in the left-hand menu.
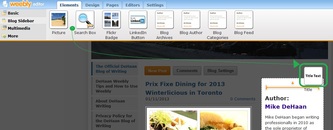 Weebly Sidebar #2 : image by Mike DeHaan Next I drag a “Text Title” towards the sidebar, and am ready to drop it in. That's not the correct kind of element, but it is just an example.
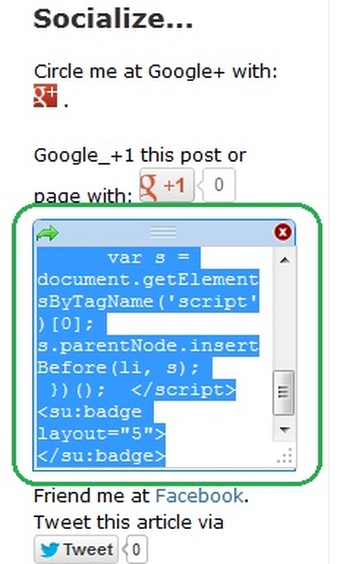 Weebly Sidebar #3 : image by Mike DeHaan I gave up on the "Title" widget but clicked on my existing "StumbleUpon" widget in the sidebar. In my sidebar, when I actually click on a text area such as the Stumble-Upon notice, it shows the HTML code (actually PHP or whatever). Anyway, it's code rather than simple text. I'm not sure whether this is an out-of-date option or whether one of the available tools still permits this.
The key point is that you need the specific HTML code. For example, if you have “blogroll” code in a different blog, you could copy-and-paste that into an HTML area. Offhand, I don't know how to code a blogroll.
It won't work if it's normal Weebly text, because that forbids HTML codes...if memory serves.
Of course, Google or Google-Plus or StumbleUpon give their members the sharing code from their logged-in sites.
Once you have the code in place, you have to click the "Publish>>" button in the upper-right of the top menu (where it says "Publish>> ? Help! X Close").
Recap for Adding Widgets to the Weebly Sidebar
- Edit the blog, but do not select any one article. (In the example shown, I was not editing any one blog post. Now that I'm editing this one, the "Sidebar" option is not available).
- Drag and drop a widget into the sidebar. Just now, I don't have time to figure out which type(s) of widgets permit (HTML) code rather than normal text. Try it and see...and leave a comment if you figure it out before I have a chance to do so!
- If Weebly supplies the right widget, just skip the next point; you don't need to change the code.
- If Weebly does not supply the exact widget you need, you probably need to get it from another reliable source. I know that's how I got the G+ and StumbleUpon buttons.
- Once you have the code in place, click your mouse in a different widget to finish the current one.
- Once you're done, click the "Publish>>" button in the upper-right of the top menu line. (That's the row with "Publish/?/Help!/X_Close").
- Try it out in "reader" mode.
Thanks for the question, Renu. If I do not see another comment here in the next week or so, I will try to tweak the sidebar again and figure out exactly which widget is which. Updated on Jan. 22, 2013
First, I just added a picture to the top of the sidebar today, and a note at the bottom of the sidebar about the different widgets available there.
Second, and more importantly, the "Custom HTML" widget is found in the Elements + More + Misc menu, but only when updating a blog post (or possibly a static page).
This is the custom HTML widget. It's just text, but you cannot use the formatting tools such for bold, italic, etc. However, I could code some HTML here. On the other hand, I cannot drag or copy this element to the sidebar when I'm editing the sidebar. Nor is the "custom HTML" widget available while updating the sidebar.
Do you ever need to update an older article in your Weebly blog? How do you reach it through the Weebly editor page?
This article explains how to use the Weebly archive, from the sidebar, to access old Weebly blog articles.
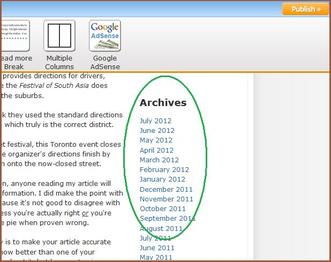 "Weebly Archive List" image by Mike DeHaan Simply scroll down the page to find the Archives list as shown in my image. It's in the right-hand sidebar of your Weebly editing page.
Put the Archive into the Weebly Sidebar (if it isn't there already)
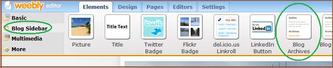 "Weebly Sidebar Menu" image by Mike DeHaan If you don't already have the Weebly Archives list in your sidebar, look to your main menu.
Click the "Sidebar" to open that menu area, and then drag the "Sidebar" widget to the sidebar. You can place it higher or lower, depending on the other sidebar elements you've included; how often you use the sidebar; and whether you want your visitors to work through the archives or read the other sidebar elements first.
Smart Planning for Using Your Weebly Archive
I keep a list of my articles and blogs in a spreadsheet, noting: - The publication date of the article.
- The title of the article.
- The URL of the article.
The title and URL allow me to link to that article from any other article, whether in Weebly or elsewhere. However, such a link delivers the reader's version of the Weebly article. If you're signed into a Wordpress site as an author, you usually have the option to edit the article you're reading. I don't see that option in Weebly. Therefore, to update an old Weebly article, it's easier to go into the Weebly editor for the blog. Then I click on the Archive month, since I was clever enough to log the publication date. It does not take much scrolling to find the article. You could even search for a keyword from the title, using your browser's search function.
Your Visitors Can Use the Weebly Archive
Visitors will also see the Weebly archive in the sidebar, so they could investigate older articles if they want to learn more about you.
There are better ways for visitors to explore a site, but it's a possibility. If you want to hide old articles from your readers, maybe you should remove the archive from the Weebly sidebar.
Your Feedback is Welcome
Let me know if this article about using the Weebly archive is helpful.
Also, I welcome feedback about these Weebly tips.
Thanks for reading!
The first meaningful choice after deciding to build a web site using Weebly is: Should this information go onto a (static) page or into a blog post? What do these choices mean?A typical blogger's web site has a set of blog posts plus one or more static pages. This, right here, is one blog post. By default, the web site lists the posts in reverse chronological order: the most recent is on top, the first is on the bottom or hidden behind a "<<Previous" hyperlink. But as far as the main menu is concerned, all the blog posts are inside the blog group. (In this case, inside "DeHaan Weebly Tips and How to Use Weebly"). The static page can be large or small. By default, each static page is listed in the main menu. This quickly becomes unwieldy; Weebly allows static pages to be grouped inside a main organizing page. Many business or information-oriented web sites have a lot of static pages. This is how most "old style" web sites were developed: with many static pages and a main menu split into categories. (Updated 2012-02-29): Another consideration is whether you expect to update the article in the future. Weebly seems to lack an index list for the blog posts, so updating an old post requires a lot of tedious clicking on " <<Previous". (I've been doing this with my " TraffUP Tips..." article). Weebly Tip
Weebly Tip: If you plan to write an "endless" number of loosely-connected articles, put them into one "blog" group and allow Weebly to keep them organized by date.
If you have a grand scheme to present a few related articles, you might use a set of static pages.
If you expect to update an article from time to time, it's easier to find one static page than to scroll back with the "<<Previous" link.
You should write one "About Me" page and feature it prominently. Weebly Tip #2: Updating an Old Post
If I need, or want, to update an old blog post, what's the fastest way to get there inside the Weebly editor? I needed to learn this because I had written "TraffUP Tips for Safe and Effective Web Traffic Improvement" in July 2011. When TraffUP changed some of their rules in early 2012, I had to update my article. The slow way was to "Edit" my site, scroll to the bottom of the page, and then click the '<<Previous' link. The fast way, as I realized today, is: - "Edit" the site.
- Scroll down and watch for the appropriate month in the right-hand menu under "Archives".
- Click that month, and scroll down to the correct article.
- "Edit" the correct article.
This saves a lot of boring '<<Previous' clicks, time and patience. Tip #3: This is a Blog within a Blog!
By March 2012, I had forgotten that this "Weebly Tips" group is actually a blog within my Blog of Writing.
That's why the previous section about "updating an old blog post" is stuck inside the current article, rather than living as its own blog entry.
Folks, I plan to sort this out in the next week or so, once I get a bit of time. It's not difficult to do things right; it just takes longer to fix things if you start on the wrong foot.
Millions of web pages have "Weebly Tips" or guides for "How to Use Weebly". Why should I add mine? My tips will be helpful and useful. Eventually I will make a single-page guide to all these blog entries.My tips will be simple and straight-forward. They won't assume that you already know a lot about the way Weebly works. My tips will be based on things I had to learn just to get my blog, "The Official DeHaan Blog of Writing", up and running.I will probably add more reasons as I go. This is enough to get started.
|
 RSS Feed